| I'm offline
|
|||||
| Home | Gallery | Downloads | CV | About Me | Special |
|---|---|---|---|---|---|
| Dead MotherNyctalusLea | |||||

Click on one of the thumbnails to see all of the Dead Mother images. |
||||||||||||||||||||||||||||||||||||||||
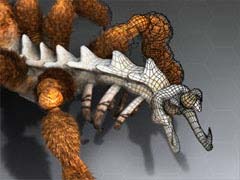
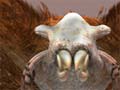
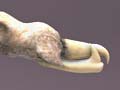
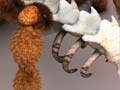
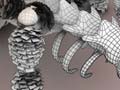
The Dead Mother is part of the game Below & Beneath, a project I've worked on for one year. I've modelled, rigged, textured and posed this creature. A speciality of this asset is its hair – I've implemented it with planes stuck into the mesh and exported with a hard alpha. The following paragraphs give you an insight on the Dead Mother's history and the techniques behind its creation. Below & Beneath is a 3D action adventure with role-playing elements. I worked on it during my education at the Berlin Games Academy together with a team of seven game designers, programmers and artists. The game is set in an underground cave system. Early on we decided that we needed one cave with an extraordinarily large asset. Something impressive for the player to explore. That's where the Dead Mother came in handy. For the level geometry we modelled pretty much every detail instead of using normal maps. Accordingly, the Dead Mother – as a part of the level geometry – consists of about 35,000 triangles. That's a rather luxurious poly count for a regular character. However, once it's in-game this one has no joints and thus no skinning. That way a relatively high poly count is a practical way to go.
A feature of this model is its hair. Lots of two-triangle planes accomplish the look we desired – and they're cheap in terms of both effort and performance. Usually (and that means in a professional game development studio) a programmer would take a hairless model and put hair on it. For example he may use the vertex color. Turnaround of the Dead Mother. Don't see a video here? Flash Player 8 or higher is required. Let's say the vertex color's red channel defines the hair density. A red value of 0 means no hair at all while a red value of 255 means dense hair. The artist defines vertex colors and is done with it. As I said: usually. We deliberately let an artist stick in the planes by hand. Although it's the slower and less efficient option it significantly reduced the work load for our programmers so they could concentrate on other important tasks. However, on the next occasion we will probably decide to have a programmer complete the hair-making task. I'll write a few lines about what gets better that way. We come back to the vertex color. The programmer not only makes hair with it, he also adjusts the global thickness. Although he doesn't change individual vertex colors an overall more or less is just a few lines of code away. Not only that: the programmer can define planes as billboards. Now they are very nice! First of all, billboards can align themselves with the camera. That way the player can't easily expose the planes as – well, planes. Secondly, the programmer can choose to have billboards rendered at the very end of a frame. Here it's good to know two things: first, the Dead Mother's hair is the only thing that is partly transparent and thus the only thing for which the graphics card uses Alpha Testing. And second, on graphics cards Early Z Testing is a technique that determines whether an object is invisible in the current frame. If it is invisible then its pixels don't run through the pixel shader. Which in turn gives you better performance. And you want that. However, Early Z Testing only works as long as nothing requires an Alpha Test (or Alpha Blending). The beauty of billboards allows the following solution. You render everything except for the billboards. Early Z Testing is enabled since there's nothing that needs Alpha Testing so far. At the end of the frame you render the billboards. They do require Alpha Testing and thus deactivate Early Z Testing. At this point everything runs through the pixel shader. But that's not a problem at all because the only thing left at this stage are the billboards anyway. Having a programmer add hair to a model like this is the way to go – if the task list allows it. Alright then, now that you know everything there is to know about the Dead Mother feel free to explore its gallery. You find the images at the top of this page. More about the Dead Mother: Maya project and wallpaper. |
||||||||||||||||||||||||||||||||||||||||
| Some rights reservedQuestions or comments? Get in touch!Subscribe to RSS feed | ||||||||||||||||||||||||||||||||||||||||